Summer CSA Week 12

Thanks to everyone who spent their Saturday with us. We loved getting to meet so many of you, and having the opportunity to show all of you this beautiful space we love!

Last week was BUSY here on the farm! We spent the beginning of the week getting the rest of the first two plantings of carrots out of the field and washed. We now have about 7,200 pounds of carrots in our root cellar waiting to be put in your weekly share boxes, and eventually hitting grocery store shelves and restaurant plates.

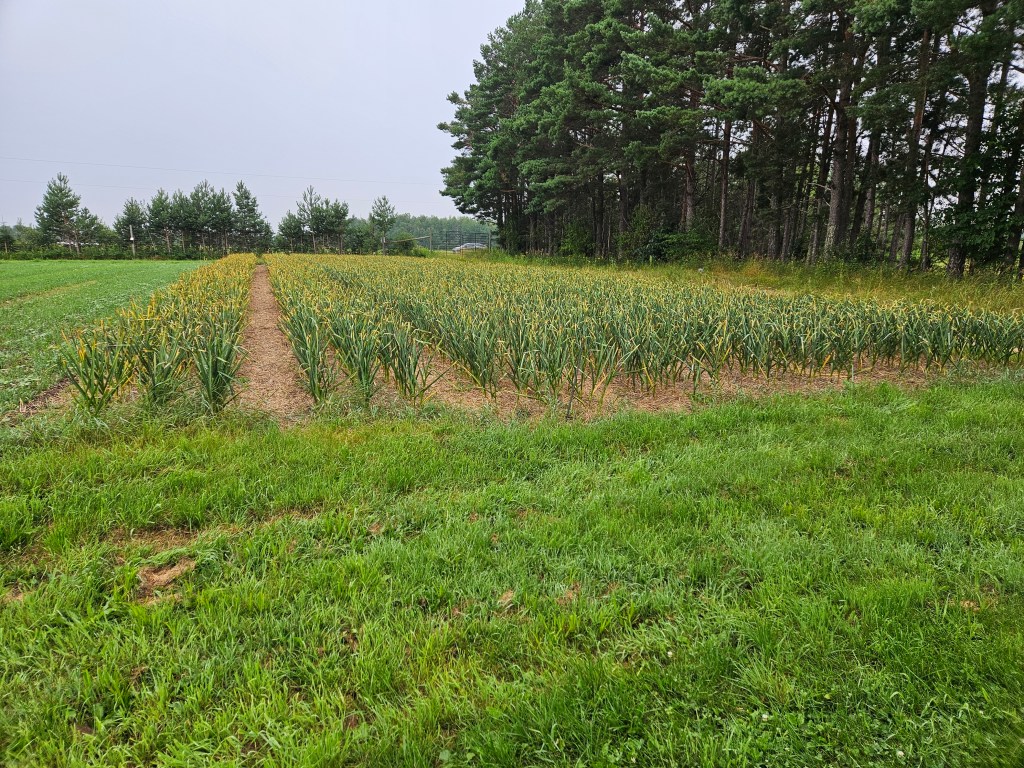
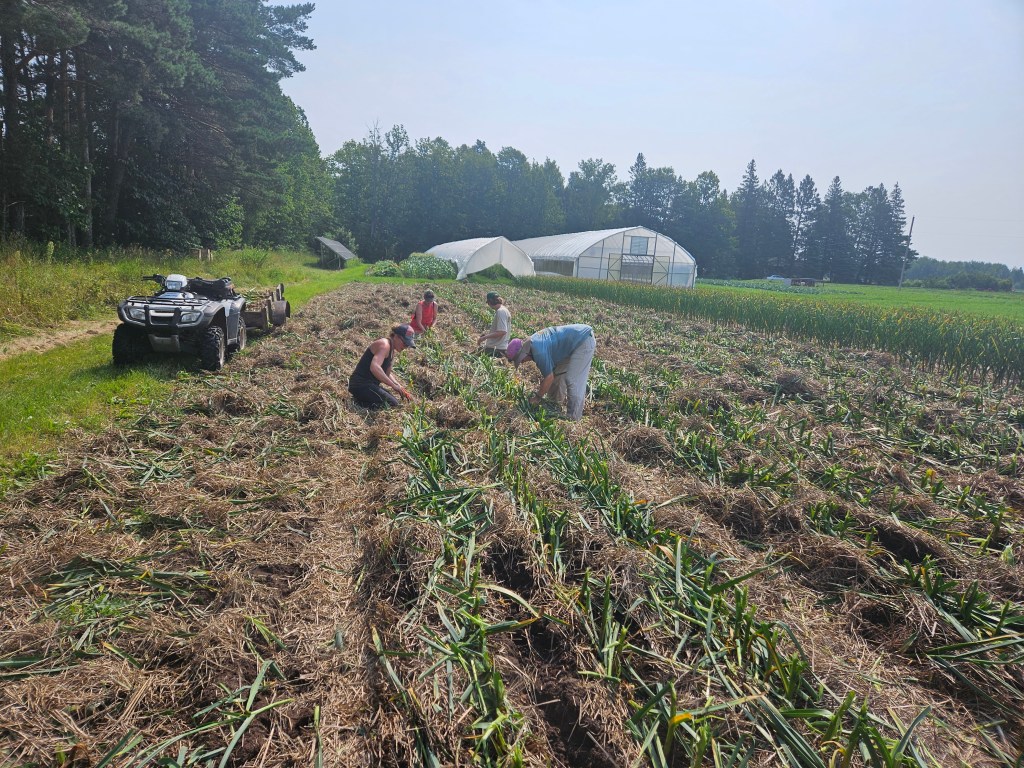
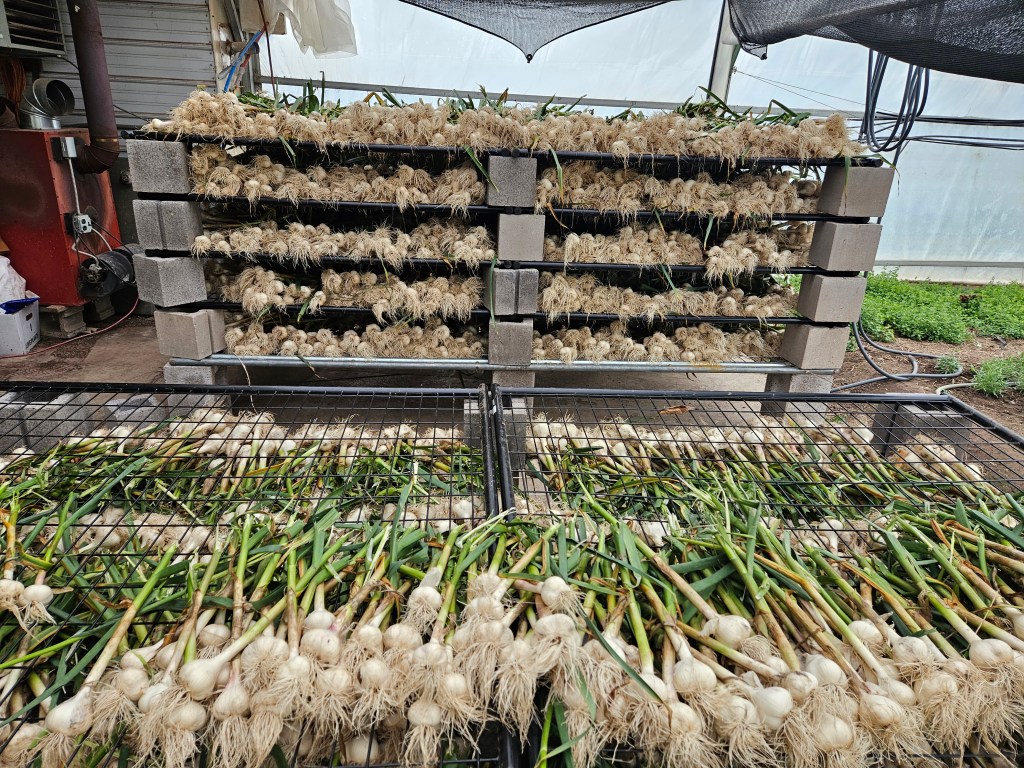
Now that the first two plantings of carrots are out of the field and washed, we were able to turn our attention to other crops. We spent time pulling all of the onions, and laying them on the plastic mulch to begun the drying process. We leave the onions here for a week or two to let the sun and wind naturally start drying them out. After the onions have begun to dry and form their protective outer shells, we cut off the stem, move them to drying racks in the greenhouse and place them in front of fans to fully dry for winter storage. We usually dry the garlic and have plenty of time to put all the garlic away and clean up the greenhouse before it’s time for the onions to dry. However, if you haven’t caught it yet, this year has been a wild and unpredictable year on the farm. We had to pull the onions a little early this year because some of them had started to bolt. Bolting is when a plant prematurely puts on flowers.

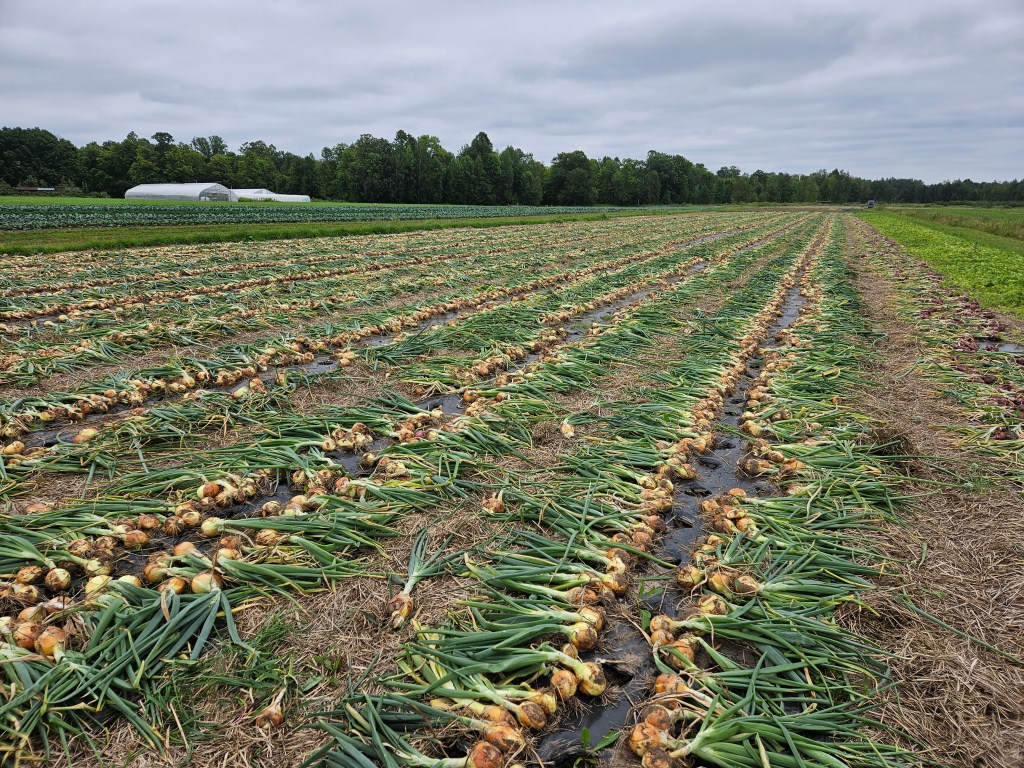
Onions are considered a biennial plant. This means in the first year, we plant the onions from seed and they will create the onion bulbs we all know and love. If we left them in the ground over winter, the next summer the onions would put on a flower and eventually that flower would create seeds (the same ones we plant to create this cycle). Every once in a while, the changes in the environment can confuse the onion into thinking it’s in its second year of growing and needs to put on a flower. Some of these environmental factors are too hot, too cold, too much water, or too little water. My research led me to learn that specifically when temps dip below 45°, the plant thinks it has entered “winter”, then when it warms back up, the plant thinks it has entered summer in year two leading it to put on flowers. Our best guess is that those few overnights in the end of June/early July that got down to low 40s, tricked the onions into believing they were in winter.

When the onions start to bolt, it’s important to get them out of the ground sooner rather than later because the big, thick stems, has the possibility to prevent the onions from properly drying. We rely on the dried onions in the winter for our Winter CSA boxes, and for selling to local restaurants. This means this year we will be drying garlic and onions at the same time. The greenhouse space isn’t big enough to handle both at once (hence why we usually dry one then the other), so we’ve had to get creative clearing out some other spaces to house the onions for a while.

We also picked the first tomatoes from our caterpillar tunnel. We’ve learned a lot from having this new tunnel, but the taste of the tomatoes is the most important part. Beautiful looking plants don’t mean as much to us if the fruit it produces doesn’t taste good. We are doing a taste test of the tomatoes this week. We plan to compare the regular greenhouse tomatoes to the caterpillar tunnel tomatoes to see if one tastes better than the other, or if they are equally delicious. We plan to give you all a thorough update next week on both the tunnel itself and the taste of the tomatoes, so stay tuned!

In your share this week:

Thyme – Onions – Kale – Basil – Green Beans – Carrots – Tomatoes

Zucchini – Cucumber – Cilantro – Green Peppers – Hot Peppers – New Potatoes

Lemon Thyme Shortbread cookies

Ingredients

  • 3/4 cup unsalted butter, softened 
  • 1 1/2 cups powdered sugar, divided
  • 2 Tbsp. lemon zest, plus more for garnish
  • 1 1/2 tsp. chopped fresh thyme, plus more for garnish
  • 1/2 tsp. vanilla bean paste or extract
  • 1 1/2 cups all-purpose flour, plus more for work surface and cutters
  • 1/2 tsp. kosher salt
  • 2 Tbsp. fresh lemon juice (from 1 lemon)

Directions

  1. Beat butter and 1/2 cup of the powdered sugar in a stand mixer fitted with a paddle attachment on medium speed until smooth, about 1 minute. Beat in lemon zest, thyme, and vanilla until combined, about 30 seconds.
  2. Whisk together flour and salt in a medium bowl until combined. With mixer on low speed, gradually add flour mixture to butter mixture, beating just until dough comes together, about 1 minute, stopping to scrape down sides of bowl as needed. Shape dough into a 6-inch disk, and wrap in plastic wrap. Let chill until firm, at least 1 hour or up to 24 hours.
  3. Preheat oven to 350°F. Line a large rimmed baking sheet with parchment paper. Roll out dough on a lightly floured work surface to 1/4-inch thickness. Cut desired shapes using lightly floured 2-inch cookie cutters. Chill, reroll, and cut dough scraps as needed. Transfer shapes to prepared baking sheet, spacing 1 inch apart. Freeze until firm, about 10 minutes.
  4. Bake in preheated oven until the edges are set, 14 to 16 minutes. Let cool on baking sheet for 5 minutes. Transfer cookies to a wire rack; let cool completely, about 30 minutes.
  5. In a medium bowl, whisk together lemon juice and remaining 1 cup powdered sugar until smooth. Dip, drizzle, or spread glaze over cooled cookies as desired. Sprinkle additional lemon zest and thyme over cookies. Let stand until glaze is set, about 30 minutes.

African Peanut Soup

  • 2 tbsp olive oil
  • 1 medium onion, chopped (1 cup)
  • 1 tbsp ginger, minced
  • 1 jalapeño, seeds and ribs removed, diced
  • 4 garlic cloves, minced (1 tbsp)
  • 1/2 tsp pepper
  • 2 tsp cumin
  • 2 tbsp tomato paste
  • 14 oz crushed tomatoes
  • 4 cups chicken stock
  • 1 sweet potato, peeled and diced
  • 1 (14 oz) can chickpeas, drained
  • 1 cup creamy natural peanut butter
  • 4 cups kale, roughly chopped
  • 1.5 lbs skinless, boneless chicken breast, cooked, shredded
  • 1 tsp salt (to taste)
  • peanuts, crushed
  • cilantro, chopped (optional) for garnish
  1. In a large pot heat olive oil over medium heat. Add onions and sauté until softened, about 3-4 minutes.
  2. Add in ginger, jalapeno and garlic and stir until fragrant about 1 min. Add the pepper, cumin and tomato paste and cook for another 2 minutes, stirring, until paste darkens.
  3. Add the crushed tomatoes, stock, sweet potatoes, chickpeas and peanut butter. Bring to a boil and stir until fully combined. Turn the heat down to low and simmer for 15 minutes, until sweet potatoes are tender.
  4. Add in kale and shredded chicken and cook for another 5 minutes. Taste the soup before adding salt. Depending on how salty your stock and/or peanut butter was, it may not need anymore salt. If you use low sodium stock and salt-free peanut butter, it will need a full teaspoon salt, maybe more. Adjust to your own liking.
  5. Serve warm topped with cilantro and crushed peanuts. Enjoy!

For the farm crew,

Jennifer

Summer CSA Week 11

We hope you’re ready! This Saturday, August 24th is our wonderful Coffee On The Farm event. We will have coffee, hay rides, dog pets, and farm tours from 10am-12pm. This is a great event for all, so bring your friends, family, neighbors, or make it a solo outing. We hope to see all of your smiling faces.

Last week was focused on emptying out some more rows and fields, and dusting off all the washing equipment that hasn’t been used since January when we washed the last of the 2023 carrots. 

We spent a muddy and rainy afternoon pulling the rest of the Spring/Summer beets out of the field. Seems that every time we do a big harvest of beets, it’s muddy and wet. Thank goodness for outside hoses so we can set up the “human car wash” and hose ourselves off before moving onto the next activity. We had been harvesting beets as needed which allowed the smaller beets to keep getting bigger, and it allowed us to send you the delicious tops along with the beets. It was time to pull the rest of the beets because even the small ones had sized up nicely. Restaurants like Duluth Grill and Ursa Minor will be very excited to receive such big beets that take less time and are easier to process than a handful of smaller beets. On days when we do big beet harvests, we take all the tops off while we are in the field. The tops will get tilled into the soil to add back organic matter to make the field even better the next time we use it. The beets get put into buckets and loaded on a trailer to be brought down to the packing shed. Outside the packing shed, we have our washing station set up. The buckets get dumped into our brush washer where a series of sprayer nozzles and brushes clean all the dirt off of the beets. They pop out the other side where we sort out any odd beets, and give them a final spray to get off any remaining dirt. Once the beets are all approved, they ride the roller table, which is a series of rollers that push the beets along. Eventually they drop into a pallet box where they will stay until they get packed up for CSA or retail orders. We filled one pallet box with the remaining spring/Summer beets which is estimated to be around 1,000 pounds of beets.

We spent a few days last week across the road, starting to get the first two plantings of outdoor carrots out of the ground. Normally at this time in the year, we would just be removing the first outdoor planting, but disease has hit these carrots pretty hard, so it’s best to get them out sooner rather than later in an attempt to save some of the crop. Our carrots have gotten a disease known as Aster Yellows. A bug called a Leaf Hopper carries this disease. The Leaf Hopper gets the disease when it feeds on an infected plant, then spreads the disease when it starts feeding on a healthy plant. Once a plant is infected, there is no cure, so the only option is to remove the crops or plants before the disease gets worse. We knew the carrots had this because 1) when you touch the carrot tops, hundreds of Leaf Hoppers jump and fly around. 2) from afar, you can tell because it causes the carrot tops to turn a yellow color, and some even get purple and red tops. The really infected carrots will start getting “hairy” this is where they begin to grow extra roots out of the carrot. Once the carrots get hairy, they will also take on a bitter taste. 

The first planting required lots of hand sorting to find the healthy carrots. We left quite a few carrots in the field, but we were still able to harvest and keep around 1500 pounds of carrots. That’s a lot of carrots, but a far cry from the 6,000 pounds that we should have harvested. The second planting looks a bit healthier, but is still pretty young, so get ready to receive some “baby” carrots in your shares. 

The annoying thing about Aster Yellows and Leaf hoppers is that they are not exclusive to carrots. Leaf Hoppers can infect a long list of plants including house plants, flowers, and other vegetables. We struggled earlier with asters yellow on some lettuce in a few of our greenhouses. The insects cause the leaves to turn a yellowish green color, and it tastes bitter. We had to do the same thing as with the carrots where we harvested and kept what we could, and the infected lettuce went to our chickens as an unexpected treat. Thankfully, lettuce grows really quickly, so we got a new planting seeded right away, and our chickens were very happy.

We’ve also found other diseases in our broccoli, outdoor tomatoes, the first planting of potatoes (not the big planting thank goodness), zucchini, and cucumbers. The good thing is, most of these diseases are “normal” for us, so we’ve done a lot of research on ways to slow down the spread such as harvesting infected plants last, and using different harvesting tools for healthy plants vs. infected plants. Janaki has also done a lot of research to see if any organic materials can be used in slowing disease. The downside is, just like Aster Yellows, there is no cure for these diseases. Eventually the plants will get too stressed and weak, causing them to begin either producing funny looking and strange tasting vegetables, or the plants will stop producing entirely. 

I know this wasn’t as upbeat of a newsletter as normal, but farming isn’t always happiness and sunshine. Farming is all about how you manage and move forward. We’ve never given up when things get hard. We reach out to new resources and experts, we pour an extra cup of coffee, say a few colorful words, and get back to it. This time of year can be hard looking at all the veggies that didn’t make it, but it sure makes us appreciate the veggies that did make it. We hope that this week when you get your box, you take a moment to look at all the beautiful vegetables and know that each one of them was grown with love, sweat, and maybe some dog fur.

In your share this week:

Cabbage – Green Beans – Carrots – Celery – Cilantro – Cucumbers – Dill

Green Onions – Green Peppers – New Potatoes – Tomatoes – Zucchini

Mixed Salad

Note:  ingredients are chopped or cut into very small pieces in order to absorb the dressing and each each others’ flavors better. 

2 tomatoes

2 small cucumbers

6 olives

large raw carrot, peeled

raw beet

1-2 avocados, peeled and pitted

2 potatoes (boiled)

1 large, mild onion

1 pepper

2 hard-boiled eggs

Chop all the ingredients and cut them into a very small dice. Mix them together in a bowl.  Dress with the following tahini cream dressing and mix well. 

Tahini Cream

1 to 3 cloves of garlic (to taste)

1/2 cup of lemon juice

1/2 cup of tahini

1/2 teaspoon ground cumin

6 tablespoons chopped parsley

Crushed the garlic with the salt. Mix it with a little lemon juice in a large bowl add the tahini and mix well then add the remaining lemon juice and enough cold water to achieve a thick smooth cream while beating vigorously season salt and cumin.  Add more lemon juice, garlic or salt (all to taste) until the flavor is strong and tart. 

This dressing may be used for many salads

For the farm crew,

Jennifer

Summer CSA Week 10

First things first, let’s get the business out of the way. It ‘s now August which means Coffee on the Farm is right around the corner. Please join us on Saturday, August 24th from 10am-12pm to have some delicious coffee, tour the farm, meet other CSA members, and taste some veggies straight out of the ground. This event is open to CSA members and those who are farm-curious. Bring your friends, family, neighbors, or anyone else you know who likes coffee and veggies!

Now for the fun! Last week, Janaki enjoyed some much deserved time off with his family. Thankfully he has an awesome crew who keeps things going while he’s away. This annual vacation marks 2 important timelines on the farm: garlic harvest and what I like to call “crop transition”. This is the beautiful time of year where we say our official goodbye to early season crops, and welcome the vegetable abundance that comes with the warmer weather crops.

We finished up harvesting all of the garlic, and it is set to spend the next few weeks drying away with the first group of garlic that we harvested 2 weeks ago. This marks the first empty field of the year. an exciting, but bittersweet moment.

We spent the rest of the week giving our attention to the crop transition that comes with veggie abundance. This meant saying goodbye to spring and early season crops like snap peas, napa cabbage, and Pak Choi. This meant getting any of these vegetables that might be remaining, out of the field, and taking down the pea fencing so we can put it into storage until next year.
Now we can start paying more attention to our warm weather crops such as outdoor cucumbers, tomatoes, zucchini, and peppers. It’s their time to shine, and thanks to that heat wave we got, the plants are thriving!

Last week marked the first of our peppers going out. It was great to get some peppers off the plants so smaller fruit has more space to grow. You’ll get to enjoy green peppers for a while, and as the season progresses, so will the plants resulting in delicious red peppers. Did you know that a green pepper is a pepper at its first point of maturity? Most bell peppers start out green, and as they mature they turn red, yellow or orange depending on the variety. The Jalapenos are also loving the weather lately, and we are excited to introduce these to you all this week. Be warned: these beauties pack some serious heat, so a little goes a long way.

Our zucchini got kind of a rough start this year, but looks like they’re finally coming around. When we first planted them, they immediately got attacked by squash and cucumber beetles. This left the plants weak and struggling. We put a clay spray on the plants to make them less tasty for the bugs, and it worked. The plants started growing and began producing fruit and flowers. The zucchini flowers need to be pollinated in order for fruit to grow. Ours weren’t pollinated consistently for the first few weeks, which results in strange and deformed fruit. These still taste okay, but they are unsightly and only last a day or two before they get wiggly or start to rot so we don’t send them to shares. We suspect the issue is that we planted the zucchini right next to a bed of melons, and the bees seem more interested in melon flowers rather than the zucchini flowers. This means fewer zucchini in your share, but hopefully lots of delicious and juicy melons later this month.

The outdoor tomatoes are starting to ripen, and the greenhouse tomatoes continue to get bigger and ripen at rapid speed. If you get overwhelmed by tomatoes, a great option is to freeze them and use them later for sauces, stews, salsa, or many other things. If you freeze the tomatoes with the skin on, once they’ve defrosted, the skin slides right off. No boiling necessary. This is my favorite trick to be able to enjoy the delicious taste of fresh tomatoes in the middle of winter when we’re all thinking of warmer times.

Another new introduction to your share this week is potatoes. You already got to try two of our other pre-storage crops with the green garlic and the onions. Potatoes are the next addition to this collection. We call them “new potatoes”. This means that they are young and not fully developed. They have a thin skin, and delicious flavor. We love sharing these with you as soon as possible. However, this means they aren’t fully mature. You’ll likely notice that their skin is really thin and flaky. This is because they haven’t been in the ground long enough to create the sturdy outer skin we are all used to. On the plus side, this means no peeling needed. On the downside, this means they won’t store as long, and they should be kept in the fridge. The outer skin protects the potatoes and allows them to be stored longer. Without the shell, the potatoes will turn brown and spoil quite quickly if left out at room temp for too long.

In your share this week:

Beets – Beans – Cucumbers – New Potatoes Zucchini – Baby Carrots

Broccoli – Greens Mix – Cilantro – Cucumbers – Hot Peppers – Onions – Green PeppersOregano – Tomatoes

Broccoli Pasta Salad

Ingredients

  • 3 cups small broccoli florets
  • 1 cup cut green beans
  • 2 cups uncooked gluten free fusilli pasta
  • 1 small zucchini, thinly sliced and cut into half moons (or spiralized)
  • 1 cup sliced cherry tomatoes
  • 4 oil-packed sun-dried tomatoes, chopped
  • 8 fresh basil leaves, thinly sliced
  • ¼ cup pine nuts
  • sea salt and freshly ground black pepper
  • Lemon Tahini dressing: (can be made ahead)
  • 3 tablespoons extra-virgin olive oil
  • 3 tablespoons tahini
  • 3 tablespoons fresh lemon juice, more for squeezing at the end
  • 2 tablespoon white wine vinegar
  • 1 garlic clove, minced
  • ½ teaspoon Dijon mustard
  • ½ teaspoon maple syrup
  • ½ teaspoon sea salt
  • 3 tablespoons water
  • Instructions:
  • In a small bowl, whisk together the olive oil, tahini, lemon juice, vinegar, garlic, mustard, maple syrup, salt and water. Set aside.
  • Prepare a large pot of salted boiling water and a large bowl of ice water. Drop the broccoli and green beans into the boiling water and blanch for 1-2 minutes, until tender but still bright green. Remove and immediately immerse in the ice water to stop the cooking processing. Keep in the ice water long enough to cool completely, about 15 seconds. Then, drain and and place on a kitchen towel to dry.
  • In a large pot of salted boiling water, prepare the pasta according to the instructions on the package, cooking until al dente. Drain and rinse with cold water.
  • In a large bowl, combine the broccoli, green beans, zucchini, tomatoes, basil and the pasta. Drizzle with the dressing and toss. Season to taste with salt, pepper, and squeezes of lemon, if desired. Sprinkle with the pine nuts and chill for 15 minutes. Can be stored in the refrigerator for up to 2 days.

Veggie Fajitas

SIMPLE PICO

  • 2 tomatoes, diced small
  • 1 garlic clove, minced
  • 1 jalapeño, minced
  • 1 lime, juiced
  • 1 small onion, diced small
  • 1/2 tsp. kosher salt
  • 1/4 tsp. black pepper
  • 3 Tbsp. fresh cilantro, chopped

FAJITAS

  • 2 Tbsp. salted butter, divided
  • 2 Tbsp. olive oil, divided
  • 6 oz. white button mushrooms, halved
  • 1 small red onion, sliced
  • 1 Tbsp. steak seasoning
  • 1 bell pepper, sliced into strips
  • 1 poblano pepper, sliced into strips
  • 1 small yellow squash, halved lengthwise and cut into half-moons
  • 1 small zucchini, halved lengthwise and cut into half-moons
  • 2 limes, juiced
  • 1 Tbsp. honey

Directions

For the simple pico: Combine the tomato, garlic, jalapeño, lime juice, onion, salt, pepper, and cilantro in a medium bowl.

For the fajitas: Heat 1 tablespoon of the butter and 1 tablespoon of the oil in a large heavy-bottom skillet over medium-high heat. Add the mushrooms and onions in a single layer. Let cook undisturbed for 2 to 3 minutes, allowing the vegetables to char. Season with half of the steak seasoning, and stir. Remove to a plate and set aside.

Add the remaining 1 tablespoon butter and 1 tablespoon olive oil to the skillet and heat over medium-high heat. Add the bell pepper, poblano, yellow squash, and zucchini in a single layer. Let cook undisturbed for 2 to 3 minutes, allowing the vegetables to char. Season with the remaining steak seasoning, then stir in the reserved mushrooms and onions. Let cook until the vegetables are tender but still have some bite, about 2 minutes more. Stir in the lime juice and honey, and remove from the heat.

Serve the fajitas with the simple pico, tortillas, cheddar jack, crema, lime wedges, and hot sauce.

Summer CSA Week 9

Last week was an exciting week here on the farm. It was garlic harvest! Well, part one of two for garlic harvest.

This is a much anticipated time on the farm. Garlic is the crop that takes by far the longest to go from being planted to being ready for harvest. Garlic gets planted in the Fall, usually by Halloween, and doesn’t get harvested until the end of July or early August. That’s almost 9 months of growing to create the beautiful bulbs that you all get to enjoy.

A little background about garlic, there are two main types of garlic: hardneck and softneck. Hardneck garlic is what we grow on the farm, while softneck garlic is generally what you find in most grocery stores. Hardneck garlic gets its name from the hard neck or stem that grows in the middle of the bulb. This is actually where the garlic scapes came from (remember those from a few weeks ago?) making it two crops in one. If the scapes are left on the plant, it will eventually create a flower. However, this also results in a very small garlic bulb because the plant has spent all its energy on creating a flower rather than on creating the garlic bulb. By removing the scapes, we redirect the plant’s energy back to creating a big, beautiful bulb. Hardneck garlic needs to experience a hard freeze in order for the individual cloves to form. The freeze initiates the division of the cloves. Without a freeze, you end up with what’s called a “round”. This is one massive garlic clove. Makes for easy peeling, but really difficult to use since I’ve never found a recipe that calls for that much garlic at one time. This is why we have to plant the garlic in the fall, then wait so long before harvesting.

 We know the garlic is ready to harvest when about half of the leaves have started to brown and die. If the garlic is harvested too early, the cloves won’t be fully formed and you’ll end up with a small bulb.You also run into the possibility of air pockets between the skin and the cloves which could lead to moisture getting trapped and hindering the drying process. If we wait too long to harvest, the bulb will start splitting which exposes the cloves and prevents the bulb from being stored. It’s a delicate balance. Janaki wasn’t sure if the garlic was ready to harvest, so we decided to harvest half of the garlic that seemed further along, and leave the rest of the garlic for another week to give it more time to mature. 

On harvest day, we mow off some of the foliage to make them easier to handle. Then Janaki uses a tractor attachment to gently loosen the bed so it’s easier to pull the bulbs from the soil. At this point, one crew jumps in and we start pulling all of the garlic bulbs out one by one. They get loaded onto a trailer, then moved over to the greenhouses to be washed. Another crew gently sprays off any excess dirt, and lays them on racks in front of industrial sized fans to begin the drying process.  After harvest, the garlic needs to dry for about a month (timeline depends on temps and humidity) in order for the papery, protective shell to properly form. You can eat the garlic before it’s dried, but it won’t store if it doesn’t get properly dried. After the garlic is dried, we save the biggest, best looking bulbs to use for next year’s planting. That’s right, garlic is the gift that keeps on giving. We harvest the garlic, dry it, select the best bulbs, break them apart into individual cloves, plant the cloves in the Fall, and repeat. Once you get garlic, you never have to buy it again because you can keep planting it over and over. Because you can keep using the garlic over and over to plant, I asked Janaki when the last time garlic was purchased to use for seed, and he said it had been so long that he couldn’t remember but knew it was long before 2010 (the year he and Annie took over the farm). That’s more than 14 years of the same garlic being used over and over! He did say that this might be the first year he may purchase more seed garlic since the garlic preserving shares sold this year were at an all time high. Thanks for all the garlic love!

In your share this week:

Cauliflower – Cucumber – Carrots – Green Garlic – Kale – Onion – Parsley – Green Pepper – Sage – Tomatoes – Zucchini

Zucchini stuffed with sausage and sage

INGREDIENTS

  • 2 to 3 pounds zucchini
  • 1/2 cup walnuts
  • 1 pound sausage
  • 1 onion, diced
  • 8 ounces mushrooms, diced
  • 3 to 4 cloves garlic, minced
  • 2 tablespoons minced fresh sage
  • 2 eggs
  • 1 cup shredded pecorino cheese, divided

INSTRUCTIONS

  • Pre-heat the oven to 375° F.
  • Cut the zucchini in half lengthwise and scoop out the seeds. Leave an inch or so of zucchini. Set the zucchini in the baking pan cut-side up and season it with olive oil, salt, and pepper. Pour a quarter inch of boiling water into the pan, cover with foil, and bake for 10 minutes, just until the zucchini is no longer raw. Set aside to cool enough to handle.
  • Spread the walnuts on a baking sheet and roast them alongside the zucchini for 5-10 minutes, until fragrant. Chop into small pieces and set aside.
  • Heat a large skillet over medium-high heat. Brown the sausage, breaking it up into medium-sized bits as you go. Transfer to a bowl and drain off all but a teaspoon of the grease. Add the onions to the pan with a good pinch of salt, and cook until soft and golden. Add the mushrooms and another pinch of salt. Cook together until the mushrooms have turned golden and any moisture they released has evaporated. Stir in the garlic and sage. Cook for about thirty seconds until fragrant.
  • Combine the walnuts, cooked sausage, onions, and mushrooms in a large bowl. Beat the eggs together. Stir the eggs and 3/4 cup of the pecorino into the stuffing mixture.
  • Pat the zucchini dry and fill the cavity with the stuffing..
  • Drain the liquid from the baking pan, rub it with a little butter or olive oil, and place the stuffed zucchini back inside. Cover with foil and bake for 30 minutes. Uncover, sprinkle the remaining cheese over the zucchini, and bake for another 10-15 minutes until the filling is bubbling and the cheese is crispy.
  • Allow the zucchini to cool slightly. Slice into portions and serve. Leftovers will keep refrigerated for one week

Mediterranean tuna salad

  • 1 (5-ounce) can albacore tuna in water, drained
  • 1 small bell pepper, halved, cored, and finely chopped (1 cup)
  • 2 tablespoons extra-virgin olive oil
  • 2 tablespoons fresh lemon juice
  • 1 teaspoon grainy mustard
  • 3 tablespoons chopped capers
  • ½ cup chopped fresh parsley
  • Kosher salt and freshly ground pepper
  • Dressed salad greens for serving
  • Sliced cucumbers and crackers, for serving

Directions


Place tuna in a bowl and flake with a fork.
Add bell pepper, oil, lemon juice, mustard, capers, and parsley; stir well to combine and season with salt and pepper.
Serve with salad greens, cucumbers, and crackers on the side