Summer CSA Week 16

It feels like June was just a few days ago, and here we are in our 16th week of CSA shares! Maybe that’s because the weather the last few weeks have felt more like Summer than Fall. Sunday night’s chill was a nice reminder that it is indeed officially Fall, but we’re looking forward to another beautiful week to get things done.

For most people, this time of year means slowing down and getting cozy as the days shorten and the nights lengthen. For those of us lucky people in agriculture, we won’t be slowing down any time soon. The Fall equinox marks the start of the busiest time of year for us (and also the perfect time to sign up for a Winter Share)!

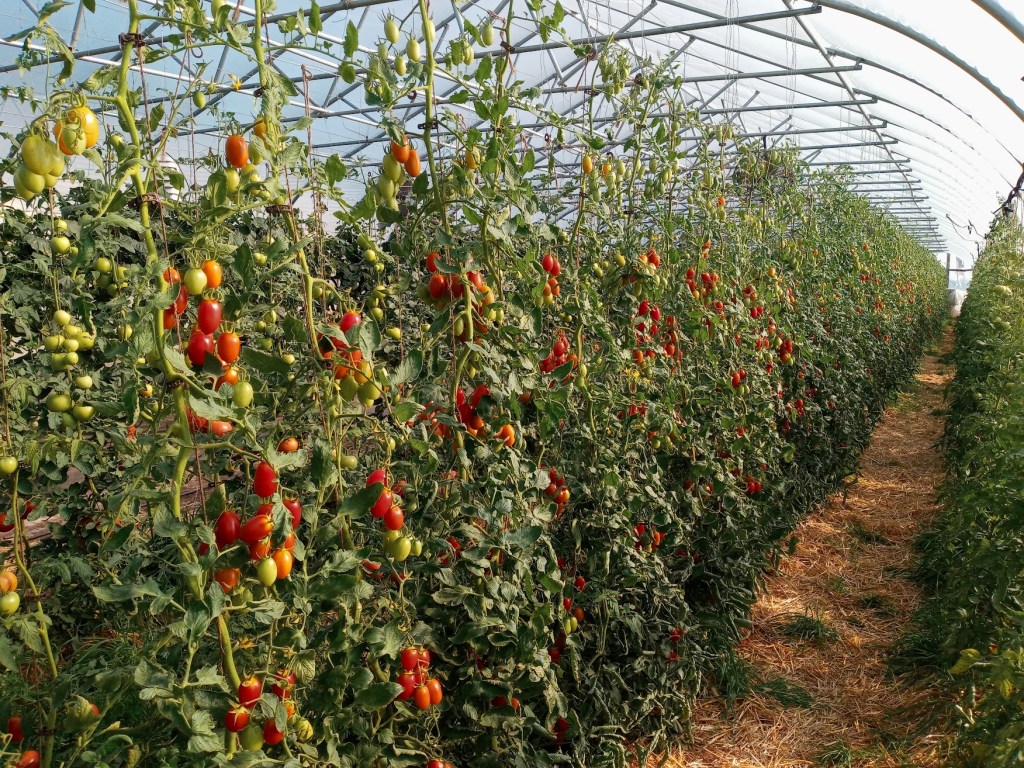
Over the next few weeks, we’ll say goodbye to our Summer crops such as melons, zucchini, and cucumbers. Those fields will soon go from green to brown, then back to green as we make our final harvests, till in the plants, and seed our cover crop. We will begin to say hello to more of our Fall and winter crops such as leeks, rutabaga, parsnips, and winter squash. This also means we will be spending lots of time cleaning and sanitizing storage space to put all of these crops for the winter. 

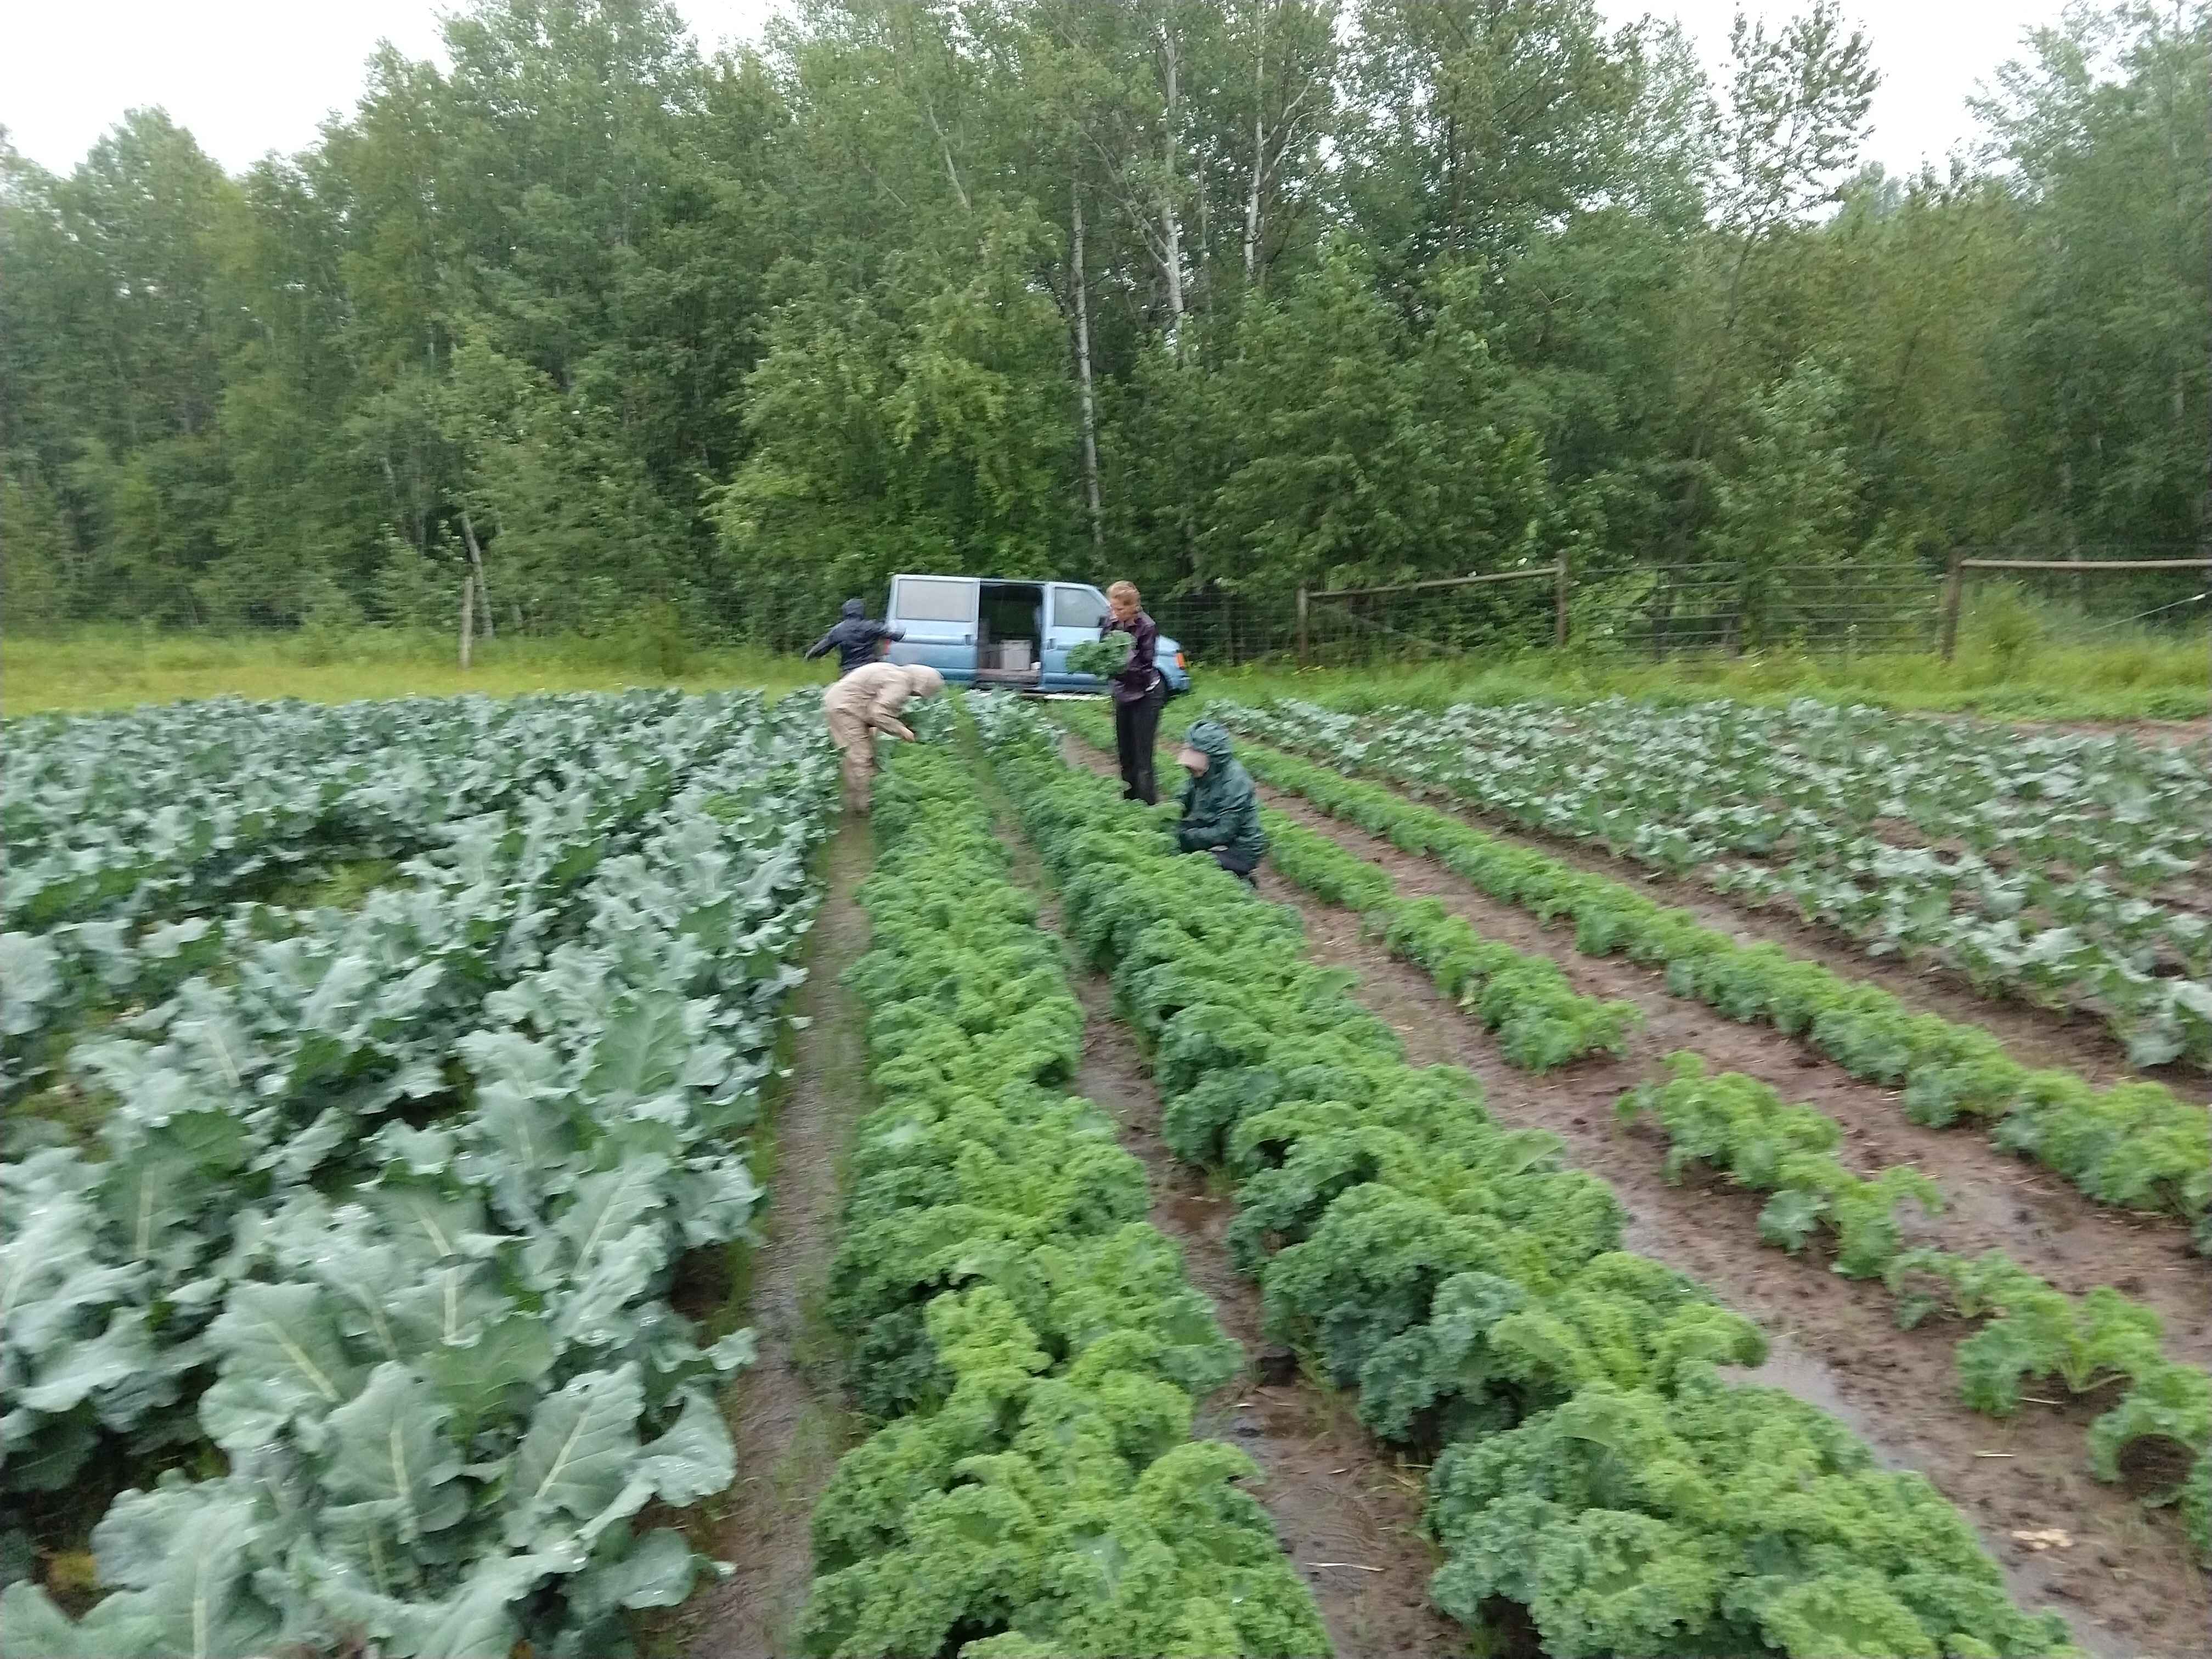
With the colder nights, this time also begins to signal a flavor change in the crops. The colder weather causes some crops to convert a portion of their starches into sugars. The addition of sugar causes the freezing point of the water inside the plant to be lowered. This now means the plant can withstand colder temperatures before it’s ruined. The plants most known for this are carrots, kale, and beets. This is one of the reasons why we have a spring/Summer planting and a fall planting of these veggies. The early planting becomes available at a time when we are all excited (and possibly a little desperate) to add some color back into our food after the long winter. The early plantings add more of an earthy flavor to dishes, while the later planting adds a little bit more sweetness. Getting to enjoy the flavor changes in the vegetables is one of the many beautiful things about farming.

Another exciting change happening on the farm is that our smaller hens have started laying eggs! For those of you with an egg share, you may have already noticed this last week when one or two smaller eggs showed up in your share. These are thanks to our little ladies who are just starting to lay. We got these hens back in early May. They’ve spent the last 4 months growing and exploring different areas of the farm. They start out in a fully enclosed shed to keep them warm, and protected from the elements. After about a month, we move them to a mobile chicken coop that we place over one of our fields we aren’t currently using. This allows them to start getting used to the wind and change in temperature while still being fully protected from the rain. It also introduces them to insects and vegetation. It’s beneficial for the farm because they are producing free fertilizer for us which adds nutrients back into the field. Once the hens get bigger and start showing signs of being adventurous (aka once they start trying to escape), we move them to a fenced off area with a larger mobile coop. This allows them to roam around in a larger area during the day, but still have a sheltered place to protect them from the rain and sun. The mobile coop also houses their egg boxes, food and water. It also is fully enclosed with a lockable door for protection at night. The Farm has a surprisingly high amount of coyotes, wolves, raccoons, and foxes close by, so keeping the chickens locked up at night is a must! 

In your shares this week:

Carrots – Cucumber – Northeaster Pole Beans – Leeks – Lettuce – Melons – Onions – Parsley – Red Peppers – Russet Potatoes – Winter Squash – Tomatoes – Zucchini

Winter Squash Crumb Cake

Streusel:

1/2 packed cup of light brown sugar

1/2 c flour

1 tsp pumpkin spice blend

1/4 cup unsalted butter cut into cubes

Cake:

1 cup light brown sugar

2 large eggs

2 cups pureed squash

1/4 unsalted butter, melted

1/4 cup neutral oil

1 Tbsp pumpkin spice blend

1/2 tsp salt

1 tsp baking powder

1/2 tsp baking soda

1 1/2 cups flour

1.  Heat oven to 350 degrees.  Grease 8″ square or 9″ round baking pan and line with parchment paper.

2.  Make the streusel:  in a small bowl, combine sugar, flour, spice and salt.  Add the butter then pinch the butter into the four mixture with your fingertips until the mix forms pebble-size crumbs.

3.  Make the cake:  in a large bowl, whisk the sugar and eggs until pale and foamy, about 1 minute.  Add the squash puree, melted butter, oil, pumpkin spice and salt.  Whisk until combined and smooth.  Whisk in the baking powder and baking soda then whisk in the flour. 

4.  Transfer the batter to the prepared pan, smooth the top and tap on the counter a few times to release any large air bubbles.  Sprinkle the streusel evenly over the top.

5.  Bake the cake until puffed and golden and a toothpick inserted into the center comes out clean (40-45 minutes).  Set the cake in the pan on a rack to cool.  After about 15 minutes remove the cake from the pan and set it on a rack to cool completely

Turkish- Style Braised Leeks

  • 3 large leeks, cleaned well and trimmed, whites and tender green parts sliced into ¼-inch rounds
  • 2 to 3 carrots, peeled and cut into ¼-inch rounds
  • 3 large garlic cloves, minced
  • Kosher salt and black pepper
  • 1 teaspoon cumin
  • 1 teaspoon Aleppo pepper
  • 2 tablespoons rice, I used Arborio rice, rinsed
  • Juice and zest of 1 large lemon
  • ½ cup chopped fresh parsley
  • Olive oil
  • In a medium saucepan heat ¼ cup extra virgin olive oil over medium-high heat until shimmering. Add the leeks, carrots, and garlic and season with kosher salt, black pepper, and the spices. Toss around and cook for about 5 to 7 minutes, stirring regularly as needed until the leeks and carrots soften just a bit.
  • Add 2 cups of water, the rice, and lemon juice. Bring the water to a boil, then lower the heat and let simmer for 15 to 20 minutes or until the rice is fully cooked and the vegetables are fully tender.
  • Let the leeks and carrots cool down to room temperature, then stir in the fresh parsley, lemon zest, and another good drizzle of extra virgin olive oil.

Tomato-Green Bean Salad with Chickpeas, Feta and Dill

salt and pepper

3/4 lb green beans (cut diagonally into 1in pieces)

2 Tbsp lemon juice

1 Tbsp red wine vinegar

1 garlic clove (or less), minced finely

3 Tbsp olive oil

2 cups tomatoes cut into bite sized pieces

2 cups cooked chickpeas (1 can), drained

1/2 cup crumbled feta

2-3 Tbsp roughly chopped dill

pinch of dried oregano

1.  bring medium saucepan of water to boil over high heat.  Add 1 tsp salt then green beans.  Cook until beans are tender-crisp (about 2 minutes).  Transfer to large bowl of cold water.  Drain in colander and blot dry.

2. Make dressing by combining lemon juice, vinegar, garlic, pinch of salt and some black pepper in a small bowl.  Whisk in the olive oil.

3.  In a large salad bowl, combine tomatoes, beans and chickpeas.  Season to taste with salt and pepper.  Add dressing and stir to coat.  Add feta and toss once more.  Let marinate for 10-15 minutes before serving.

4.  Before serving, sprinkle generously with dill and oregano

For the farm crew, 

Jennifer

Summer CSA Week 10

First things first, let’s get the business out of the way. It ‘s now August which means Coffee on the Farm is right around the corner. Please join us on Saturday, August 24th from 10am-12pm to have some delicious coffee, tour the farm, meet other CSA members, and taste some veggies straight out of the ground. This event is open to CSA members and those who are farm-curious. Bring your friends, family, neighbors, or anyone else you know who likes coffee and veggies!

Now for the fun! Last week, Janaki enjoyed some much deserved time off with his family. Thankfully he has an awesome crew who keeps things going while he’s away. This annual vacation marks 2 important timelines on the farm: garlic harvest and what I like to call “crop transition”. This is the beautiful time of year where we say our official goodbye to early season crops, and welcome the vegetable abundance that comes with the warmer weather crops.

We finished up harvesting all of the garlic, and it is set to spend the next few weeks drying away with the first group of garlic that we harvested 2 weeks ago. This marks the first empty field of the year. an exciting, but bittersweet moment.

We spent the rest of the week giving our attention to the crop transition that comes with veggie abundance. This meant saying goodbye to spring and early season crops like snap peas, napa cabbage, and Pak Choi. This meant getting any of these vegetables that might be remaining, out of the field, and taking down the pea fencing so we can put it into storage until next year.
Now we can start paying more attention to our warm weather crops such as outdoor cucumbers, tomatoes, zucchini, and peppers. It’s their time to shine, and thanks to that heat wave we got, the plants are thriving!

Last week marked the first of our peppers going out. It was great to get some peppers off the plants so smaller fruit has more space to grow. You’ll get to enjoy green peppers for a while, and as the season progresses, so will the plants resulting in delicious red peppers. Did you know that a green pepper is a pepper at its first point of maturity? Most bell peppers start out green, and as they mature they turn red, yellow or orange depending on the variety. The Jalapenos are also loving the weather lately, and we are excited to introduce these to you all this week. Be warned: these beauties pack some serious heat, so a little goes a long way.

Our zucchini got kind of a rough start this year, but looks like they’re finally coming around. When we first planted them, they immediately got attacked by squash and cucumber beetles. This left the plants weak and struggling. We put a clay spray on the plants to make them less tasty for the bugs, and it worked. The plants started growing and began producing fruit and flowers. The zucchini flowers need to be pollinated in order for fruit to grow. Ours weren’t pollinated consistently for the first few weeks, which results in strange and deformed fruit. These still taste okay, but they are unsightly and only last a day or two before they get wiggly or start to rot so we don’t send them to shares. We suspect the issue is that we planted the zucchini right next to a bed of melons, and the bees seem more interested in melon flowers rather than the zucchini flowers. This means fewer zucchini in your share, but hopefully lots of delicious and juicy melons later this month.

The outdoor tomatoes are starting to ripen, and the greenhouse tomatoes continue to get bigger and ripen at rapid speed. If you get overwhelmed by tomatoes, a great option is to freeze them and use them later for sauces, stews, salsa, or many other things. If you freeze the tomatoes with the skin on, once they’ve defrosted, the skin slides right off. No boiling necessary. This is my favorite trick to be able to enjoy the delicious taste of fresh tomatoes in the middle of winter when we’re all thinking of warmer times.

Another new introduction to your share this week is potatoes. You already got to try two of our other pre-storage crops with the green garlic and the onions. Potatoes are the next addition to this collection. We call them “new potatoes”. This means that they are young and not fully developed. They have a thin skin, and delicious flavor. We love sharing these with you as soon as possible. However, this means they aren’t fully mature. You’ll likely notice that their skin is really thin and flaky. This is because they haven’t been in the ground long enough to create the sturdy outer skin we are all used to. On the plus side, this means no peeling needed. On the downside, this means they won’t store as long, and they should be kept in the fridge. The outer skin protects the potatoes and allows them to be stored longer. Without the shell, the potatoes will turn brown and spoil quite quickly if left out at room temp for too long.

In your share this week:

Beets – Beans – Cucumbers – New Potatoes Zucchini – Baby Carrots

Broccoli – Greens Mix – Cilantro – Cucumbers – Hot Peppers – Onions – Green PeppersOregano – Tomatoes

Broccoli Pasta Salad

Ingredients

  • 3 cups small broccoli florets
  • 1 cup cut green beans
  • 2 cups uncooked gluten free fusilli pasta
  • 1 small zucchini, thinly sliced and cut into half moons (or spiralized)
  • 1 cup sliced cherry tomatoes
  • 4 oil-packed sun-dried tomatoes, chopped
  • 8 fresh basil leaves, thinly sliced
  • ¼ cup pine nuts
  • sea salt and freshly ground black pepper
  • Lemon Tahini dressing: (can be made ahead)
  • 3 tablespoons extra-virgin olive oil
  • 3 tablespoons tahini
  • 3 tablespoons fresh lemon juice, more for squeezing at the end
  • 2 tablespoon white wine vinegar
  • 1 garlic clove, minced
  • ½ teaspoon Dijon mustard
  • ½ teaspoon maple syrup
  • ½ teaspoon sea salt
  • 3 tablespoons water
  • Instructions:
  • In a small bowl, whisk together the olive oil, tahini, lemon juice, vinegar, garlic, mustard, maple syrup, salt and water. Set aside.
  • Prepare a large pot of salted boiling water and a large bowl of ice water. Drop the broccoli and green beans into the boiling water and blanch for 1-2 minutes, until tender but still bright green. Remove and immediately immerse in the ice water to stop the cooking processing. Keep in the ice water long enough to cool completely, about 15 seconds. Then, drain and and place on a kitchen towel to dry.
  • In a large pot of salted boiling water, prepare the pasta according to the instructions on the package, cooking until al dente. Drain and rinse with cold water.
  • In a large bowl, combine the broccoli, green beans, zucchini, tomatoes, basil and the pasta. Drizzle with the dressing and toss. Season to taste with salt, pepper, and squeezes of lemon, if desired. Sprinkle with the pine nuts and chill for 15 minutes. Can be stored in the refrigerator for up to 2 days.

Veggie Fajitas

SIMPLE PICO

  • 2 tomatoes, diced small
  • 1 garlic clove, minced
  • 1 jalapeño, minced
  • 1 lime, juiced
  • 1 small onion, diced small
  • 1/2 tsp. kosher salt
  • 1/4 tsp. black pepper
  • 3 Tbsp. fresh cilantro, chopped

FAJITAS

  • 2 Tbsp. salted butter, divided
  • 2 Tbsp. olive oil, divided
  • 6 oz. white button mushrooms, halved
  • 1 small red onion, sliced
  • 1 Tbsp. steak seasoning
  • 1 bell pepper, sliced into strips
  • 1 poblano pepper, sliced into strips
  • 1 small yellow squash, halved lengthwise and cut into half-moons
  • 1 small zucchini, halved lengthwise and cut into half-moons
  • 2 limes, juiced
  • 1 Tbsp. honey

Directions

For the simple pico: Combine the tomato, garlic, jalapeño, lime juice, onion, salt, pepper, and cilantro in a medium bowl.

For the fajitas: Heat 1 tablespoon of the butter and 1 tablespoon of the oil in a large heavy-bottom skillet over medium-high heat. Add the mushrooms and onions in a single layer. Let cook undisturbed for 2 to 3 minutes, allowing the vegetables to char. Season with half of the steak seasoning, and stir. Remove to a plate and set aside.

Add the remaining 1 tablespoon butter and 1 tablespoon olive oil to the skillet and heat over medium-high heat. Add the bell pepper, poblano, yellow squash, and zucchini in a single layer. Let cook undisturbed for 2 to 3 minutes, allowing the vegetables to char. Season with the remaining steak seasoning, then stir in the reserved mushrooms and onions. Let cook until the vegetables are tender but still have some bite, about 2 minutes more. Stir in the lime juice and honey, and remove from the heat.

Serve the fajitas with the simple pico, tortillas, cheddar jack, crema, lime wedges, and hot sauce.

Summer CSA Week 12, 2023

It was so nice to see Food Farm folks this Saturday–we enjoyed speaking with so many of you and show off our hard work!

As some of you may have noticed, the root cellar is gradually filling up with a colorful abundance of carrots, beets, cabbage and potatoes. The farmers have been diligently packing up more and more of these vibrant vegetables, destined for grocery store shelves and eager CSA members.

Moreover, last week marked the collapse of our onion tops. This may sound slightly catastrophic, but don’t worry – it’s a good thing! The leaves fall over simply because the plant has matured and is no longer developing. It’s also how we know they are ready for harvest. In the photo (see left), you can see Teri & Aaron gently lifting them from the ground before laying them out to dry. Careful handling is essential during harvest to avoid bruising, which makes the bulbs susceptible to storage rot. Following the uprooting, these onions will begin their curing process in the fields for a week or so before having their tops removed and transferred to a well-ventilated indoor storage space.


In your share this week:

Basil – Beans – Broccoli – Cauliflower – Carrots – Celery – Cucumber – Melons

Sweet Onions – Bell Peppers – Potatoes – Tomatoes – Zucchini


The recipes this week have a lot of room to make them your own. Either one would be good with just about any item in the share (excluding the melons). So feel free to follow them as directed or create your own pizza & curry experiments…


Zucchini Crust Pizza, from The Cozy Cook

2 cups shredded zucchini
1/4 teaspoon salt
3 large eggs, beaten
1/2 cup all purpose flour (almond flour, coconut flour, and whole wheat flour may also be used)
1/3 cup shredded parmesan

  1. Preheat oven to 350°.
  2. Spread the shredded zucchini out on a lightly greased baking sheet and sprinkle lightly with salt. Bake for 15 minutes. Remove and transfer the zucchini to paper towels or a cheesecloth.
  3. Increase oven temperature to 450°.
  4. Squeeze out as much additional moisture from the zucchini as possible. Add the zucchini to a large bowl along with the whisked eggs.
  5. Sprinkle the flour in gradually, stirring to incorporate. Continue to add flour until desired consistency is obtained. (I use the entire ½ cup for all-purpose flour.)
  6. Spread out onto a lightly greased 12-inch pizza pan, leaving 1-inch or so around the edges.
  7. Top with shredded Parmesan cheese and bake for 18 minutes, until it begins to brown slightly. Remove from oven.
  8. Reduce heat to 400°.
  9. If possible, let the crust cool for extra crispy results.
  10. Top with desired pizza toppings. Bake for ~10 minutes, until the cheese is melted and bubbly.

Summer Vegetable Curry, Inspired by Half Baked Harvest

Basil Coconut Ginger-Lime Rice:

1 (14 ounce) can coconut milk
1 cup jasmine or basmati rice
1 tablespoon fresh ginger grated
1 lime juiced + zest

  1. Add the coconut milk to a medium size pot. Bring to a low boil and then add the rice, salt, and ginger. Stir to combine and then place the lid on the pot and turn the heat down to the lowest setting possible. Allow the rice to cook ten minutes on low and then turn the heat off completely and let the rice sit on the stove, covered for another 20 minutes (don’t take any peeks inside!). After 20 minutes remove the lid and add the lime juice + zest.

Curry:

4 tablespoons extra virgin olive oil
1 pound boneless, skinless chicken, diced
2 bell peppers, chopped
1 zucchini, chopped
2 cups green beans, chopped
1 cup broccoli, diced
1 cup cauliflower, diced
1 cup carrots, diced
1 tablespoon fresh ginger, grated
2 cloves garlic, grated or minced
2-3 tablespoon thai red curry paste
1 (14 ounce) can coconut milk
1 tablespoon fish sauce
1/2 cup fresh basil, chopped
1 mango, diced
1 jalapeño, seeded + diced
fresh naan and goat cheese, for serving

  1. Heat a little olive oil in a large skillet over high heat. Add the chicken and cook until browned and cooked through, about 5-10 minutes.
  2. Add another drizzle of olive oil to the skillet. Add the peppers, zucchini, beans, broccoli, cauliflower, carrots, ginger and garlic. Cook the veggies 5 minutes or until they just begin to soften.
  3. Add the coconut milk, curry paste, and fish sauce. Stir to combine, bring the mixture to a boil, cook 5 minutes or until the sauce thickens slightly. Remove from the heat and stir in the basil.
  4. In a small bowl toss together the mango and jalapeño.
  5. Serve the curry over the rice. Add a spoonful of the mangos and a sprinkle of goat cheese. Eat with Naan!

For the farm crew,

Charlie

Summer CSA Week 11, 2023

It’s farm tour time–this Saturday from 10-noon, we’d love to see you!

It’s melon mayhem at the Food Farm! We recently set our new daily harvest record with a whopping 377 cantaloupe. That is more than 800 pounds of weight to pull from the field! We expect them to slow down soon, so enjoy it while it lasts.

In other news that is orange, the crew christened a “new-to-us” carrot harvester. A lucky few climbed aboard as it took its maiden voyage through the fields, while the rest of the crew assembled at the washing stations. There were certainly some wrinkles to iron out, as there often is with any new piece of machinery, but by the end of the week the process seemed to be moving along rather quickly.


Beans – Broccoli – Carrots – Cilantro – Cucumbers – Dill – Greens Mix – Melons

Onion – Bell Peppers – Hot Peppers – Potatoes – Tomatoes – Zucchini


Usually the melons are best enjoyed straight up in all their glory. That way you can fully appreciate the depth of their flavor. This week though, because there are so many, I thought it would be nice to include a recipe with them in it. It does include basil, which we are not sending this week… I’m hoping some of you still have a few sprigs leftover from last weeks share, or can maybe snag some from a friendly neighbor’s garden.

P.S. The vinaigrette would also go great on the greens mix in today’s share 🙂

Melon Caprese Salad, from Half Baked Harvest

Honey Herb Vinaigrette:
1/4 cup extra virgin olive oil
2 tablespoons honey
Juice of 1 lemon
1 tablespoon white balsamic
1 cup fresh basil
1 tablespoon toasted pine nuts
1 pinch flaky sea salt

  1. To make the vinaigrette, combine all ingredients in a blender and blend until smooth.

3 balls fresh burrata cheese
4 cups melon balls
1/2 cup fresh basil leaves
2 tablespoons fresh mint
6 slices prosciutto

  1. Break the burrata in half and place each half in the bottom of a small bowl or glass (about 8 ounces). Over the burrata, layer the melon balls, basil, and mint. Top with a slice of prosciutto. 
  2. At this point the salad can be covered and placed in the fridge for up to 6 hours. 
  3. Before serving, drizzle over the vinaigrette.

Blistered Green Beans w/ Tomato-Almond Pesto, from Bon Appétit

1 1/4 cups diced tomatoes
1/8 cup unsalted, roasted almonds
1 garlic clove, grated
1 tablespoons olive oil
1 tablespoons Sherry vinegar or red wine vinegar
1/2 teaspoon paprika
Pinch of cayenne pepper
Kosher salt, freshly ground pepper
1 1/2 teaspoons vegetable oil
1 pounds green beans, trimmed

  1. Preheat oven to 450°F. Roast tomatoes on a rimmed baking sheet, turning once, until blistered and lightly charred, 15-20 minutes. Let cool slightly. Finely chop almonds in a food processor. Add garlic, olive oil, vinegar, paprika, cayenne, and half of tomatoes; pulse to a coarse pesto consistency. Season with salt and pepper.
  2. Heat 3/4 tsp. vegetable oil in a large skillet over medium-high. Add half of beans; cook, undisturbed, until beginning to blister, about 2 minutes. Toss and continue to cook, tossing occasionally, until tender, 7–9 minutes; season with salt and pepper. Spread beans out on a platter; let cool. Repeat with remaining vegetable oil and beans.
  3. Toss beans with pesto; season with salt and pepper if needed. Add remaining tomatoes and transfer to a platter.

Summer-Vegetable Casserole, from Food & Wine

Extra-virgin olive oil, for drizzling
1/2 pound potatoes, peeled and sliced 1/4 inch thick
Salt and freshly ground pepper
1 bell pepper, thinly sliced
1 small onion, thinly sliced
1 large garlic clove, minced
1 teaspoon thyme leaves
1/2 pound tomatoes, sliced 1/4 inch thick
1 medium zucchini, sliced on the diagonal 1/4 inch thick
3 tablespoons freshly grated Parmigiano-Reggiano cheese

  1. Preheat the oven to 350°. Coat a 9-inch baking dish with olive oil. Spread the potatoes in the dish in an even layer; drizzle with oil and season with salt and pepper. In a bowl, combine the bell pepper, onion, garlic and thyme and season with salt and pepper. Arrange two-thirds of the bell pepper mixture over the potatoes and drizzle with oil. Top with the tomatoes and the zucchini; drizzle with oil and season with salt and pepper. Cover with the remaining bell pepper mixture and sprinkle with the cheese.
  2. Cover the casserole with foil and bake for 40 minutes. Increase the oven temperature to 425°. Uncover the casserole and bake for about 20 minutes longer, until the vegetables are tender and glazed on top. Let stand for 10 minutes. Serve warm.

For the farm crew,

Charlie

Summer CSA Week 13

I love the little chill in the air that we have in the morning and evening now. On the farm, we’ve put in our time with some very hot and humid days! -and it’s good for a break.
Ever since I can remember I have loved this time of year, mostly. Knowing school was starting back up wasn’t usually the best part, but even the settling back into routine ended up being good for me as a kid. And as an adult, I think I always started college semesters off feeling strong and hopeful and organized (even if it ended in panicked 3am paper editing  by mid-December).

This year it feels like the shift back to school for kids and adults, and all those that teach or work with/around them is clouded in a troubling unknown. Whether you have or know children in school (however it looks), or you work with or around students in some capacity, we wish you the best as you start this next school year.
I know so many people have wondered and dreamed about what it would be like to send a child to Kindergarten one day, or to pack up for college… none of us would have dreamed this up to add to the list of worries along the way.

I think we’re all pretty sick of so many aspects of life feeling harder, or sadder, or more complicated and divisive than normal (show of hands for who thought there was more than enough of that to begin with…). I hope that there are bright spots in the midst of all of it for you as well, whether it’s been family time, or new habits or getting outside more.

As we move forward as a country with so many returning to school, I hope that in your home (regardless of connection to a school, after all, we’re all connected in this) the dinner table, or maybe breakfast table, can be a place were connection is found, worries heard and validated, and wholesome sustenance consumed to see you through incredibly challenging days.

For the farm crew,

Karin


In your share this week: Green Beans, Green Cabbage, Carrots, Cilantro, Cucumbers, Sweet Onions, Parsley, Red and Hot Peppers, Red Potatoes, Tomatoes, Zucchini


img_1241

Green Bean Salad

From The Leek and the Carrot

1 pound green beans, ends trimmed and cut in half if large (about 4-5 cups)
1 head washed lettuce, thinly sliced
1 large shallot or onion, halved and thinly sliced
1 cup crumbled feta cheese
2 cups chopped tomatoes
1 cup chopped toasted walnuts
1/2 teaspoon dried oregano
2 minced garlic cloves
1 tablespoon sherry or red wine vinegar
1/2 teaspoon dried oregano
1/2 teaspoon Kosher salt
1/4 teaspoon freshly ground black pepper
2 minced garlic cloves
3 tablespoons olive oil
Flaky sea salt, for serving

  1. Bring a large pot of water to a boil. Add green beans and cook for 4 minutes then rinse under cold water. Pat dry with a towel.
  2. Toss together lettuce, beans, shallots and tomatoes in a large bowl (or four small bowls). Top with feta and walnuts.
  3. Whisk sherry vinegar with dried oregano, salt, pepper, and garlic. Once combined, whisk in olive oil. Taste and adjust flavors as desired. Drizzle over salad. Sprinkle with a little extra flaky sea salt right before serving.

Parsley Pesto

2 cloves garlic

2 cups packed, stemmed Italian parsley

Course salt

1/4 cup walnuts

1/2 cup freshly grated Parmesan cheese, or to taste

2/3 cup olive oil

Salt and pepper

Directions

  1. In a food processor place the garlic, parsley, pinch salt, walnuts, and cheese. Process until they form a paste. Gradually blend in olive oil, taste adjust your seasoning if necessary. Great with pasta, poultry, vegetables and rice.

Summer CSA Week 11

I had a newsletter-sized case of writers block as I started putting recipes and photos in for this week. I asked my husband what I should say, and he said “get the vegetables, eat them up, num num num” -at which I laughed, probably harder than it deserved.
Num num num has become something I say a lot to my baby. It’s one of those idiosyncrasies I have that, apparently, is a little annoying to hear dozens of time at dinner for the other adult present. So strange.
So now it’s something of a running gag at our house.

It’s good to find things to laugh about. I have been trying to make space (i.e., turn off the news) in my life for more laughter. Watch a funny show, check. Pretend to eat my baby’s legs (he loves this!), check.

The season is ramping up on the farm this time of year. We will start harvesting almost non-stop very soon. We’ve started with getting in the garlic, and next the onions. Between CSA harvests, wholesale harvests and the constant cucumber, zucchini and broccoli harvest there isn’t much time left for other projects. Every year I don’t really know how we get all the stuff done. It’s a marvel.

I love this time of year on the farm though. I love the variety and bounty. I love the new potatoes! I love the go-go-go feel. It can also be a little much at times, which is why I’ve been glad over the years that often there are people on the crew who keep things fun, or have funny anecdotes about weekend activities. It’s nice to have people to share inside jokes with, or running gags. Especially in the particularly stressful year we all find ourselves in.

I hope that some laughter finds its way into your week, and that you num  num num every veggie with joy!

For the farm crew,

Karin

PS Dave has us pick just the tops of the basil, so it should be good to go for a small batch of pesto!

61887768080__50472868-5f5e-4842-bc18-2ce9d2cc2046


In your share this week:

Basil – Green Beans – Carrots – Cilantro – Cucumbers – Garlic – Head Lettuce – Onions – Green Bell Peppers – Hot Wax Peppers – New Potatoes – Tomatoes – Zucchini


img_1169


Carrot and White Bean Burgers

From the Smitten Kitchen

  • Olive oil
  • 1/2 cup panko-style breadcrumbs
  • 3 shallots, or 1 small onion, diced
  • 1 tablespoon tomato paste
  • 1 1/2 teaspoons kosher salt
  • 1 cup packed grated carrot (from 2 medium carrots)
  • 1 1/2 tablespoons apple cider vinegar
  • Two 15-ounce cans cannellini or other white beans, drained and rinsed
  • 1 large egg, beaten
  • Freshly ground black pepper
  • Burger accompaniments, as you like

Heat 1 tablespoon olive oil in a large skillet over low heat. Add the panko and cook, stirring often, until lightly browned and crisp, 3 to 5 minutes. Transfer crumbs to a large bowl, then return the pan to the heat.Add 2 tablespoons olive oil to the skillet, followed by the shallot or onion. Cook until softened and lightly golden, 8 to 10 minutes. Stir in the tomato paste, salt, and carrots and stir frequently until the carrots are soft and a bit blistered, another 8 to 10 minutes. Add the vinegar, scraping up all the browned bits until the pan is dry. Remove from heat and add the bowl with the toasted panko. Add beans and use a wooden spoon or spatula to very coarsely mash the mixture until a bit pasty and the mixture coheres in places—there should still be plenty of beans intact. Add pepper, and more salt if needed, to aste. Stir in the egg. Shape into 6 patties (I used a 1/2 cup measure as a scoop) for the size burger you see here; 4 patties for really large burgers (to warn, I found this size a little unwieldy), or 8 to 10 for slider-size.

To cook the veggie burgers, heat a thin layer of olive oil in a wide skillet over medium heat and carefully cook until browned and slightly firm to the touch, 3 to 4 minutes per side. It may be necessary to cook in batches. Serve hot or at room temperature, with whatever you like on or with veggie burgers.


Charred Green Beans with Tahini Yogurt Sauce

From The Leek and the Carrot

2 pounds green beans
1/2 cup roughly chopped almonds
1 jalapeno, minced
2 garlic cloves, minced
3 tablespoons apple cider vinegar, divided
Pinch sugar
Kosher salt, divided
1/2 cup Greek yogurt
2 tablespoons tahini
2 tablespoons water
1 tablespoon vegetable oil
1/2 teaspoon freshly ground black pepper

  1. Bring a large pot of salted water to a boil on the stove. Once boiling, cook your green beans for 5 minutes then drain and rinse under cold water.
  2. While you wait for the water to boil, you can do a few other things. First toast almonds (either in the oven or on the stove). Then in a small bowl, combine 2 tablespoons vinegar with jalapeno, garlic, a pinch of sugar and a pinch of salt.
  3. In another small bowl, combine yogurt, tahini, water, remaining vinegar and 1/2 teaspoon Kosher salt. Whisk until smooth.
  4. Once your beans have been blanched and cooled, heat oil in a large skillet over medium high heat until it glistens. Toss the blanched green beans in there and sprinkle with 1/2 teaspoon Kosher salt and 1/4 teaspoon freshly ground black pepper. Cook over medium high heat, stirring every minute or two until most sides of the green beans are a little charred (about 10 minutes).
  5. Serve by spreading yogurt mixture over a shallow bowl and topping with green beans. Sprinkle with quick pickled jalapenos and almonds before enjoying. Season with flaky sea salt (or more Kosher salt) and more freshly ground pepper before serving.

Summer CSA Week 10

A couple of weeks ago we walked through some fields – with newly sprouted cover crop – to pull out some of the towering (compared to the baby cover crop!) pig weed and lambs quarter. Looking across the fields they looked much better after, though when we were in there we could see plenty more weeds that we may get to at some point. Maybe.

Soon Janaki will be doing trip after trip with the old dump truck full of manure from a local cattle farm. The manure gets turned and composted and turned again and composted some more (a few cycles of that over weeks) and then can get used on fields next year to add rich nutrition to the soil.

Next year, crops will be moved around to avoid being planted in the same places as this year. That way we can avoid disease, pests (hopefully), and the plants can go into fields that have had time, cover crop, and nutrition added back in. Our healthy soil and extra work to maintain it keeps our vegetables healthy, and the farm healthy for years to come.

Janaki has some of the rotating stuff down to a science (I mean spreadsheets), but much of it is still an art. He knows what fields may have low spots that will be wet in spring, and can’t be used for early crops. He knows which ones have heavier, and richer soil that might be good to go to plant into, and which ones might need some organic fertilizer added in. He has a rotation of cover crops that works well for us down to a science too. Bare fields can equal sad soil, and having crops that add organic matter, or elusive nitrogen naturally back into the soil is a must for organic agriculture.

It’s a cycle of wholeness. And it leads to some pretty good whole food.

I wish I could say that everything I eat or otherwise consume follows this same pattern, or puts back what it takes out from the planet. I can’t say that; though I hope to keep moving that direction.
More and more, it is so challenging to me when I think of what things cost on the shelf not always being reflective of how much they really cost from an environmental (yes, that includes humans too!) perspective.

The truth is the cost on the shelf for organic food, or organic clothing (or non-toxic baby mattresses as I’ve found out) is an insurmountable barrier for many people, both here and around the world. I don’t want to minimize that. It’s a real problem.

Conventional agriculture is also a problem. Perhaps many of you have our CSA share because you already know this and are bothered by mono-cropping, pesticide use, loss of top soil and the list of negativity goes on.

Might I add another to the list.

Ammonium nitrate.
The elusive nitrogen that all crops (corn needs a lot, for example) require. Ammonium nitrate is one of the fertilizers that gets used around the world, in staggering quantities, in the production of all kinds of non-organic crops.

And it’s a bomb.
I feel like I should say it “can be” a bomb. It’s very often used for agriculture, but it’s also also used in war. And, I’m sure many of you remember exactly where you were on April 19th, 1995.

And in Beirut… does it matter now what the original purpose of it’s manufacture or intended destination was? Does it matter that it *could have been* fertilizer if it becomes a bomb in the middle of a city anyway?

I was living and farming in Waco, Texas when a fertilizer plant 25 minutes north, in the town of West, exploded. At the time it happened, I was video chatting with friends at a cafe, and it was only after the call ended that I realized that I had been half-hearing sirens the entire time through my head phones. When I went inside to return my cup (and to see if anyone knew what was going on), the TVs were all on, and everyone was silent or on phones trying to call friends or family.
You’d be forgiven for not remembering, it was two days after the Boston Marathon bombing.

I had no idea that that plant was up there, and if I would have known I had no idea at the time what ammonium nitrate was. I am sure many (most?) people in Beirut or in the whole of Lebanon didn’t know that tons of the stuff was being, almost randomly, disastrously, stupidly stored at their port.

I think as humans we just can’t keep up with how dangerous our world is. How much danger we add to it. We won’t be able to control storms, or drought, or volcanoes (though our actions surly add to the devastation they cause). But what we can and do add in the way of poisons, bombs… it’s overwhelming.

I wish this could be a swords to plowshares kind of post… but the materials we’re talking about aren’t nearly as simple as hammering metal into a different shape. If only that was the task we were undertaking. Again, so what if it’s destined to be fertilizer if it blows up anyway?

By partaking in the food from your CSA share each week you’re taking steps (and power!) away from the machine that seems to roll along in our world and hurt so much in it’s path. You’re taking steps (and giving power!) to safer, cleaner alternatives. It’s hard to feel like we have much power in the face of such destruction, or in the face of such wide-spread unsustainability, but the power we do have we can wield. Even by wielding your fork.

For the farm crew,

Karin


img_1104


In your share this week: Green Beans, Broccoli, Carrots, Cucumbers, Dill, Lettuce Mix, Green Onions, Parsley, Green Peppers, New Potatoes, Tomatoes, Zucchini


Many of you long-time members will remember the porch at 427 N. 16th Avenue East. The Benson’s have been members since the beginning–before the beginning, actually. Their porch served as a pickup site from 1994 until this year because they were anticipating the sale of their home. It is officially on the market this week, and I promised a number of people that I would pass along the listing once it was up. Since I don’t remember who that was, I’m sending it along to everyone in the hopes that this special place might stay in the Food Farm family: https://s.paragonrels.com/goto/2_IPp


img_1107

It doesn’t hurt that weeds can be so beautiful.


Refrigerator Pickled Green Beans

Can double or triple.

  • 5 ounces green beans
  • 1 clove garlic
  • 1/2 teaspoon coriander seeds
  • 1 small dried chile
  • 1/8 teaspoon black peppercorns
  • 1 bay leaf
  • 1 cup cider vinegar
  • 1/2 cup white wine
  • 1 tablespoon sugar
  • 1 teaspoon fine sea salt

Steps to Make It

  1. Gather the ingredients.

  2. Before you trim the green beans, arrange them vertically in a 1-pint jar to see how many will fit. Pack them in as tightly as you can—once you add the hot liquid, they will shrink just a bit, so feel free to really cram them in.

  3. Remove the beans from the jar and trim them to fit, leaving at least 1/2 inch of head-space. Pack the trimmed beans back into the jar.

  4. Peel the garlic and cut it into quarters. Stuff the garlic pieces into the jar with the green beans.

  5. Add the coriander seeds, dried chile, peppercorns, and the bay leaf into the jar around the beans.

  6. Put the vinegar, wine, sugar, and salt in a small saucepan. Bring it to a boil over high heat and boil for 2 minutes (the sugar and salt should be completely dissolved).

  7. Pour the hot mixture over the beans. The liquid should completely cover all of the beans. Screw on the lid and let the jar sit until it’s cooled to room temperature.

  8. Once the jar is cool, refrigerate the bean pickles for at least 2 days or up to 6 months before eating.


Herby Potato and Green Bean Salad

From Taproot Magazine

1 1/2 lb potatoes, cubed
1 1/2 tsp salt
1/2 lb green beans
6-8 radishes
1/4 medium onion
1/2 cup loosely packed fresh dill
1/2 cup loosely packed fresh parsley
2 sprigs fresh tarragon
3-5 green onions (to taste)

Dressing:

1/2 tsp yellow mustard seeds
1/2 tsp brown mustard seeds
1/4 c olive oil
2 Tbsp grainy mustard
2 Tbsp red or white wine vinegar
2 Tbsp lemon juice
1 Tbsp honey’
3/4 tsp salt
1/2 tsp black pepper

Boil or steam potatoes. Boil or steam beans. If boiling, add plenty of salt to water. Chill beans after cooking in ice water. Salt after steaming/rinsing.

Fold the chopped herbs and radishes, beans, and potatoes once cooled.

Lightly toast mustard seeds on medium low heat in a pan, stirring to avoid burning. Crush seeds in mortar with a pestle. Shake all dressing ingredients together in a jar.

Gently mix dressing into salad, taste for salt. Serve a bit warm, or out of the fridge up to 4 days later.


Summer CSA, Week 10

The smell of new babies and milk weed is in the air. Fresh cabbage, new potatoes and a delightful week of rain.

Above is a photo Janaki took harvesting kale in the pouring rain for Monday’s share box last week!

Janaki took a hiatus from the farm this week while the rest of us tried to fill his shoes. Also Karin greeted us with her baby boy!

We are entering the tomato season. Outside tomatoes are starting to ripen and the greenhouse tomatoes are taking off. If you are wondering what to do with all the tomatoes in your box…..you should try sun drying them!

I experimented with sun drying tomatoes in my car this weekend. It worked great. I would recommend using slicers because cherry tomatoes take twice as long as slicers do. Also place them on parchment paper. If you place them directly on tin foil them will likely stick.

The sun gold tomatoes were not completely dried after 12 hours in the car. The slicers and Juliet’s that I cut into 1/4s were!

To minimize strange looks and bugs avoid driving your car with tomatoes on the dash board.

With gratitude and grace we thank you for finding creative ways to eat tomatoes, greens mix and all the other delightful veggies we put in your box week after week.

From a smiling farm crew,

Tiffany


In your CSA box:

Green Beans, Cilantro, Cucumbers, Dill, Greens Mix, Lettuce, Onions, Snap Peas, Green Pepper, Jalapeno Pepper, NEW Potatoes, Tomatoes, Zucchini


Turmeric Roasted Potatoes with Green Beans

  • 4 cups potatoes chopped into small cubes
  • 1/2 lb green beans chopped into small pieces
  • 2 tbs olive oil
  • 1 tbs finely chopped basil
  • 1/2 tsp garlic finely chopped
  • 1/2 tbs turmeric (for some spice in life!)
  • Salt and pepper

Place oil in pan on medium heat. Once pan is hot place potatoes in pan. Cover and let cook for 5 minutes. Uncover and add green beans, herbs and spices. Cook uncovered for another 5-10 minutes. Serve immediately for maximum deliciousness.

Tomato Tart

  • Use your favorite pastry dough recipe or buy some ready to bake stuff at the co-op
  • 1 lb tomatoes
  • 1 lb ricotta cheese
  • 1 clove of garlic, sliced thin
  • Fresh chives to garnish
  • Salt and pepper

Prepare dough and place in refrigerator for later. Slice tomatoes into colander, sprinkle salt over them and let them rest for 10-15 minutes.

Roll dough out into a 14 inch round circle. Spread olive oil over it and the ricotta cheese. Add the garlic and place sliced tomatoes on top. Fold over the edges to keep everything in place.

Bake at 400 degrees for 50 minutes and enjoy!